Box Dulcimer Build Plans (FREE)

So I wanted to see if I could build an inexpensive box dulcimer out of wood. I did and the sound is quite amazing! I was able to build mine for around $70. Your price may be more or less depending on how much materials cost you and what you have already at home. This box is 7 1/2” X 26” X 3”. You can make yours whatever you like based on the wood you choose. This is a great size because for me personally I like to play in my lap. **MY finished box size after sanding was 7 1/4” x 25 7/8” x 2 7/8”
First you might ask WHY MANDY? Well I’m all for making music at any price point is the main reason. Most people don’t have money laying around to be able to buy new instruments. And there is a huge market of not so great instruments made in other countries out there, why not make something good yourself? I want something that sounds great but doesn’t break the bank. Making this does not take a high amount of skill, and simple tools can get the job done for you. So let’s get on with it. One thing I’ll ask is that if you do make one, please, please share a picture with me! Just comment down below this page. You’ll see Jon building this whole thing basically because he just loves doing it, so I let him 😉.
Materials List – easily under $100 for a quality instrument
To print this list click on list below.
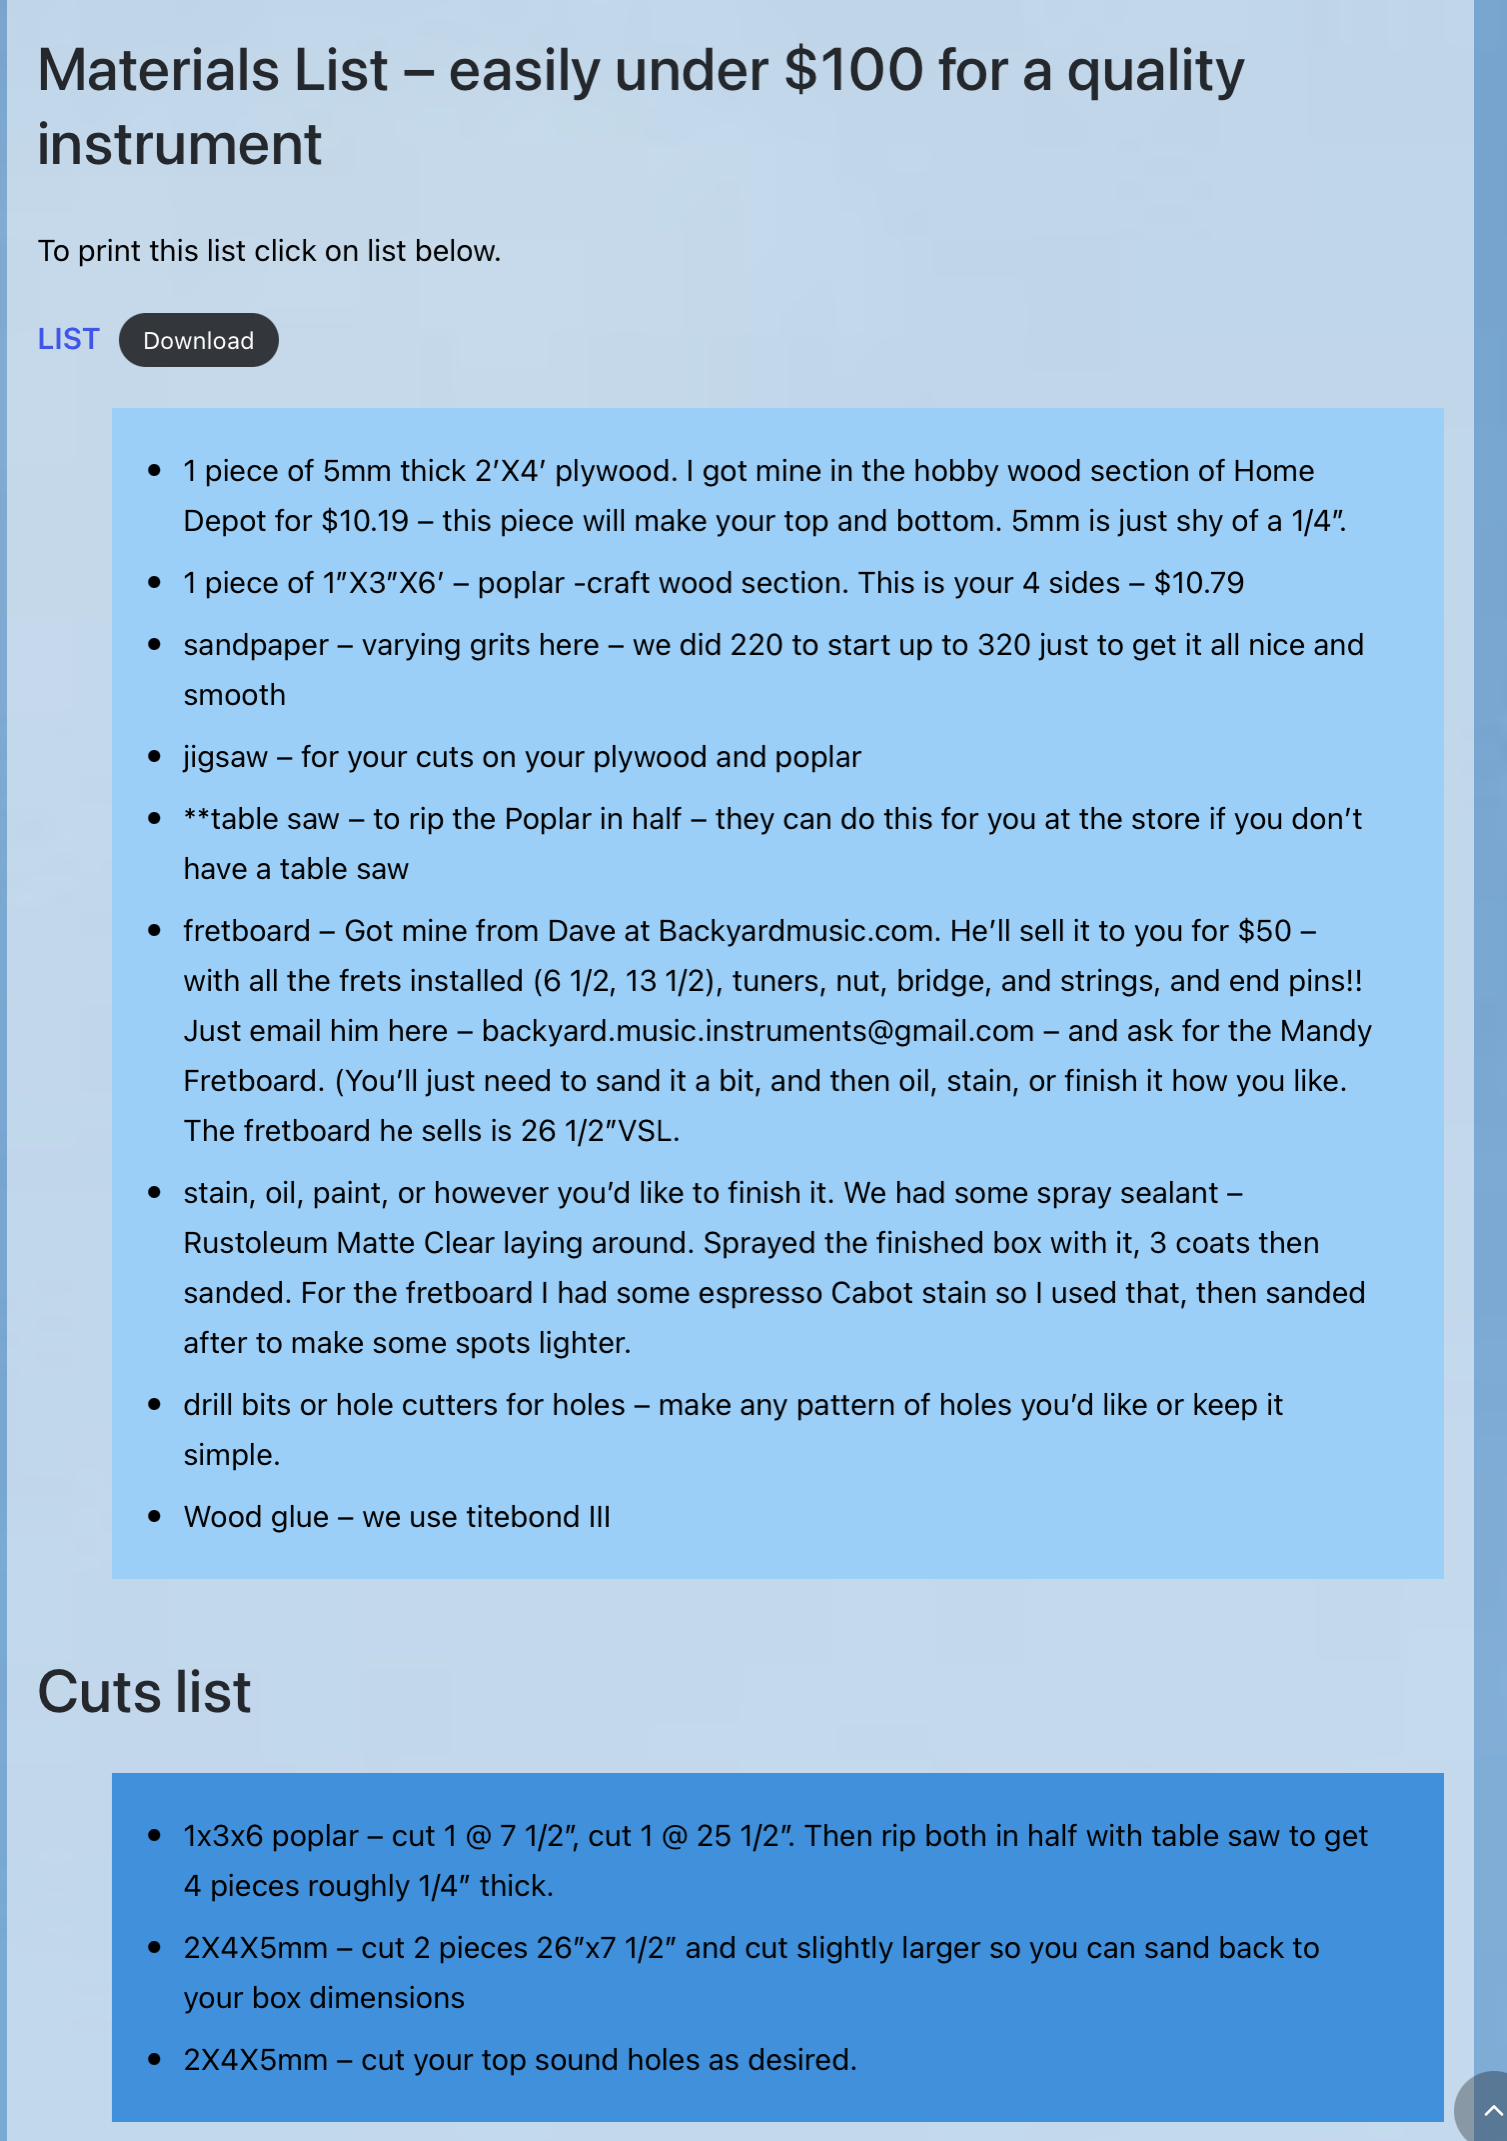
- 1 piece of 5mm thick 2’X4’ plywood. I got mine in the hobby wood section of Home Depot for $10.19 – this piece will make your top and bottom. 5mm is just shy of a 1/4”.
- 1 piece of 1”X3”X6’ – poplar -craft wood section. This is your 4 sides – $10.79
- sandpaper – varying grits here – we did 220 to start up to 320 just to get it all nice and smooth
- jigsaw – for your cuts on your plywood and poplar
- **table saw – to rip the Poplar in half – they can do this for you at the store if you don’t have a table saw
- fretboard – Got mine from Dave at Backyardmusic.com. He’ll sell it to you for $50 – with all the frets installed (6 1/2, 13 1/2), tuners, nut, bridge, and strings, and end pins!! Just email him here – backyard.music.instruments@gmail.com – and ask for the Mandy Fretboard. (You’ll just need to sand it a bit, and then oil, stain, or finish it how you like. The fretboard he sells is 26 1/2”VSL.
- stain, oil, paint, or however you’d like to finish it. We had some spray sealant – Rustoleum Matte Clear laying around. Sprayed the finished box with it, 3 coats then sanded. For the fretboard I had some espresso Cabot stain so I used that, then sanded after to make some spots lighter.
- drill bits or hole cutters for holes – make any pattern of holes you’d like or keep it simple.
- Wood glue – we use titebond III
Cuts list
- 1x3x6 poplar – cut 1 @ 7 1/2”, cut 1 @ 25 1/2”. Then rip both in half with table saw to get 4 pieces roughly 1/4” thick.
- 2X4X5mm – cut 2 pieces 26”x7 1/2” and cut slightly larger so you can sand back to your box dimensions
- 2X4X5mm – cut your top sound holes as desired.


STEP 1 – get your materials together. I wanted the fretboard to be a sure thing and didn’t want to mess with fretting something myself. Quick and easy is what I wanted. A huge bonus is that Dave gives you the tuners, strings, nut, end pins, and bridge as well!! I’ll end up replacing the plastic nut and bridge at some point also.
STEP 2 – Consider taping your thin sheet of plywood to another board or we had a piece of sheet rock lying around. This way the cut will be easier with the jig saw. Then measure your cuts and draw them out. You’ll see I have 3 – because I wanted the option of a false back for more volume (I may still add it, but this sucker BOOMS as is).
STEP 3 – Carefully cut out your lines on your plywood. This will be your top and bottom. My cut dimensions were – 7 1/2” X 25 1/2”. *after sanding it will be a tad smaller. We used tape as a guide and to prevent ragged cuts.


STEP 4- Rip down your sides board and make the cuts. **If you don’t have a table saw you should get the hardware store to do this for you, rip the board in half.
Here is a photo of it after making all the cuts on the boards. I just taped the 3 pieces (top, bottom, false back) together so I wouldn’t lose track of them. That extra piece in the back is the leftover plywood laminate board piece that we can use for the spacers for the false back if we end up adding it.
STEP 5 – Sand the ends of the 4 side boards and get ready to glue!! Also sand around the ends of the top and bottom boards here. Might as well sand the whole top and bottom boards since we are glueing. No need to sand the inside of the box unless you’d like to.


Mocking up the box. Get your boards figured out, which one is the top and how does it look? Once fitted together (before glueing) put tape around each corner of your sides. Then you can glue easily by opening it into a long line of boards, glueing each one, then taping back again.
STEP – 6 – glue the 4 sides! Go right to Step 7 while this glue is wet.
STEP 7 – Glue your bottom board onto all the sides. This helps keep it all square as well. Then weigh it all down to dry overnight.


Use whatever you got to weigh it down. Just put a board over it and under it to keep it flat.
Prior to glueing the top on – start to think about your holes and how you want them. Also – I like to put a Bible verse and the date inside anything I make, think about what you might like to put inside – and if you’d like it to be visible through your holes or not.
STEP 8 – tape your top down onto another board. So the cuts will be as nice as you can get without blowouts. Draw out your holes or whatever pattern you’d like. I had specific spots I wanted things so we drew out the fretboard too. Carefully make your cuts. *TIP – if you went ahead and cut a 3rd piece for that false back, you can use that instead for your top if you mess this part up. Clean up your sound hole cuts with sandpaper, Jon used a dremel to do some of it.


Step 9 – Put your desired writing on the inside of the box (I used a sharpie), then glue the top down and weigh it down again. You see our sophisticated setup. you don’t need much! Wait overnight again for glue to set up.
Step 10 – Tape down where your fretboard will be. This will be kinda fun because you need it to be the same width as your fretboard. We want a good surface to glue to and we don’t want it to be sanded. Now sand the entire box to your hearts content. I wanted nice corners on the box so we sanded a lot.


Step 11 – Be sure to tape the back side of your fretboard also for the same reason. If you haven’t already – at this point SAND your fretboard down to your desired smoothness.

STEP 12 – stain your fretboard (or however you’d like to finish it) *side note – for the fretboard markers, we just had some auto paint pens in black (that Jon fixed a chip in his truck with). So we filled the spots with black paint before staining. You can do this if you’d like or leave it as is.


Step 13 – seal, stain, oil, finish the box however you’d like. We had spray on sealer so we just hung it up outside and sprayed! It was very hot out so we did 3 coats in a few hours.
STEP 14 – Nows your chance – sand everything again (with a 320 or finer grit). I wanted the fretboard to have lighter spots and some darker spots so we sanded it down again too.


Step 15 – Remove the tape from the box and from the back of the fretboard. Carefully glue it (don’t use a lot of glue because you don’t want it seeping out). Weigh it down carefully and let her sit overnight again. You are so close!!
Step 16 – Install your tuners, nut, bridge (make your slots with a sharp knife), nail in the end pens for your strings. Now string that sucker up and play the heck out of it!!! You may want to adjust your nut and bridge height as well. Based on your fretboard, you’ll use whatever string spacing you like there, so I’m not putting a measurement for that. Listen to how mine turned out below. I’ve also added strap buttons. Most of all HAVE FUN and enjoy the process!
If you build one – please comment below and let me know how it went!!
These plans are 100% FREE! But – if you’d like to shoot me a few bucks for the plans and instructions you can do so HERE.
Helping others in any way I can is what drives me to do these things. I get that desire from the message of my Lord and Saviour Jesus Christ. Please feel free to pass this website and info along to whomever you think might like it. But I ask that you use your common sense and never try and profit off of this or put your name on it or anything like that. God bless you!
Hi, do you have a printed version of the plans? Thank you
Just put up a printable materials and cuts list!
Hi Mandy,
I love the sound of the dulcimer and the songs you played. You amaze me with your talents. Thank you for sharing the plans and the photos. I don’t have woodworking talents, but I surely wish I did. I would like to try to make one, even if it becomes a wall hanger, just for the experience.
Hey Suzy! Thanks, I’m sure you can do it. And if you use the fretboard from Dave, you’ll not be taking any risk with the frets. You can do it.
I just finished building one with your plans. Only made a few small changes mostly do to boo boos on my part lol. Turned out awesome and can’t wait to learn how to play it. Thank you so much for all the help by posting instructions. Jeff
I just finished building one with your plans. Only made a few small changes mostly do to boo boos on my part lol. Turned out awesome and can’t wait to learn how to play it. Thank you so much for all the help by posting instructions.
That’s awesome Jeff! I hope you’ll make a video of it so I can hear it! I still play mine a lot and love it. Just don’t do many videos on it. It’s a great dulcimer.
Hi Mandy, I just ordered my finger board and I just wanted to say thank you. Building this dulcimer has become my newest pet project me and my dad are working on. I’m so happy I ran across your YouTube video. It is giving this full time student studying accounting something fun to do when not studying.
That’s great! It will be a fun build.
Thanks Mandy! Just found your plans for the “Box dulcimer.” I just started learning how to play the Mountain dulcimer and love it very much. Especially the hymns on the dulcimer. I also love working with wood and am going to try to build from your plans. thank you again and God bless! Norm
Yes I love hymns on dulcimer too. Have fun building!
I made one. The hard par will be playing it.
I’m so happy that a bunch of people are using these plans!!! Just got contacted by 2 more folks who have used them and are making more dulcimers from the plans.
Thank you so much for sharing your plans!! I have a very talented husband who can build it for me!
I have two dulcimers. A standard McSpadden and a 6 string McSpadden. I enjoy both so much but am ignorant about strings and such. I still have original strings on mine. Do you order strings with the fret board? If not, what and where do you get the strings? Would love to have one of these for using the noter!
The strings come with it. You will love it!
Hi Mandy! I picked up a dulcimer after watching your YouTube videos and finally stumbled upon the video with these plans. My 13 year old daughter liked them so much that she decided to build this for a school project. We are in the middle of building it now and she is super excited to learn to play it! Thank you so much for sharing these plans! We will try to share a post or video with the final result.
Love it!! Have fun.